


Tutorial
In this tutorial, we’ll be scraping the front-page of HackerNews to get the post titles and links and save them to a CSV file. IF you're looking to further automate the process, you can use Abstract's Web Scraping API. Also, you can use a website screenshot API if you want to go one step further and validate the data visually.
Prerequesites
- Node.js installed on your computer.
- Basic understanding of Javascript and Node.js.
1. Project setup
To start, we’ll need to setup a Node.js project. In your terminal, change directories into an empty directory and type:
yarn init -y
Or
npm init -y
To initialize a new Node.js project. The -y flag skips all the questions that a new project asks you.
We’ll need to install two dependencies for this project: Cheerio and Axios.
In your terminal, type:
yarn add cheerio axios
That will install the packages in your project.
Now let’s get something printing on the screen.
Create a new file called scraper.js in your project directory and add the following code to the file
-- CODE language-js --console.log("Hello world!");
Next, in your terminal run the command:
node scraper
And you should see the text Hello world! in your terminal.
2. See what DOM elements we need using the developer tools
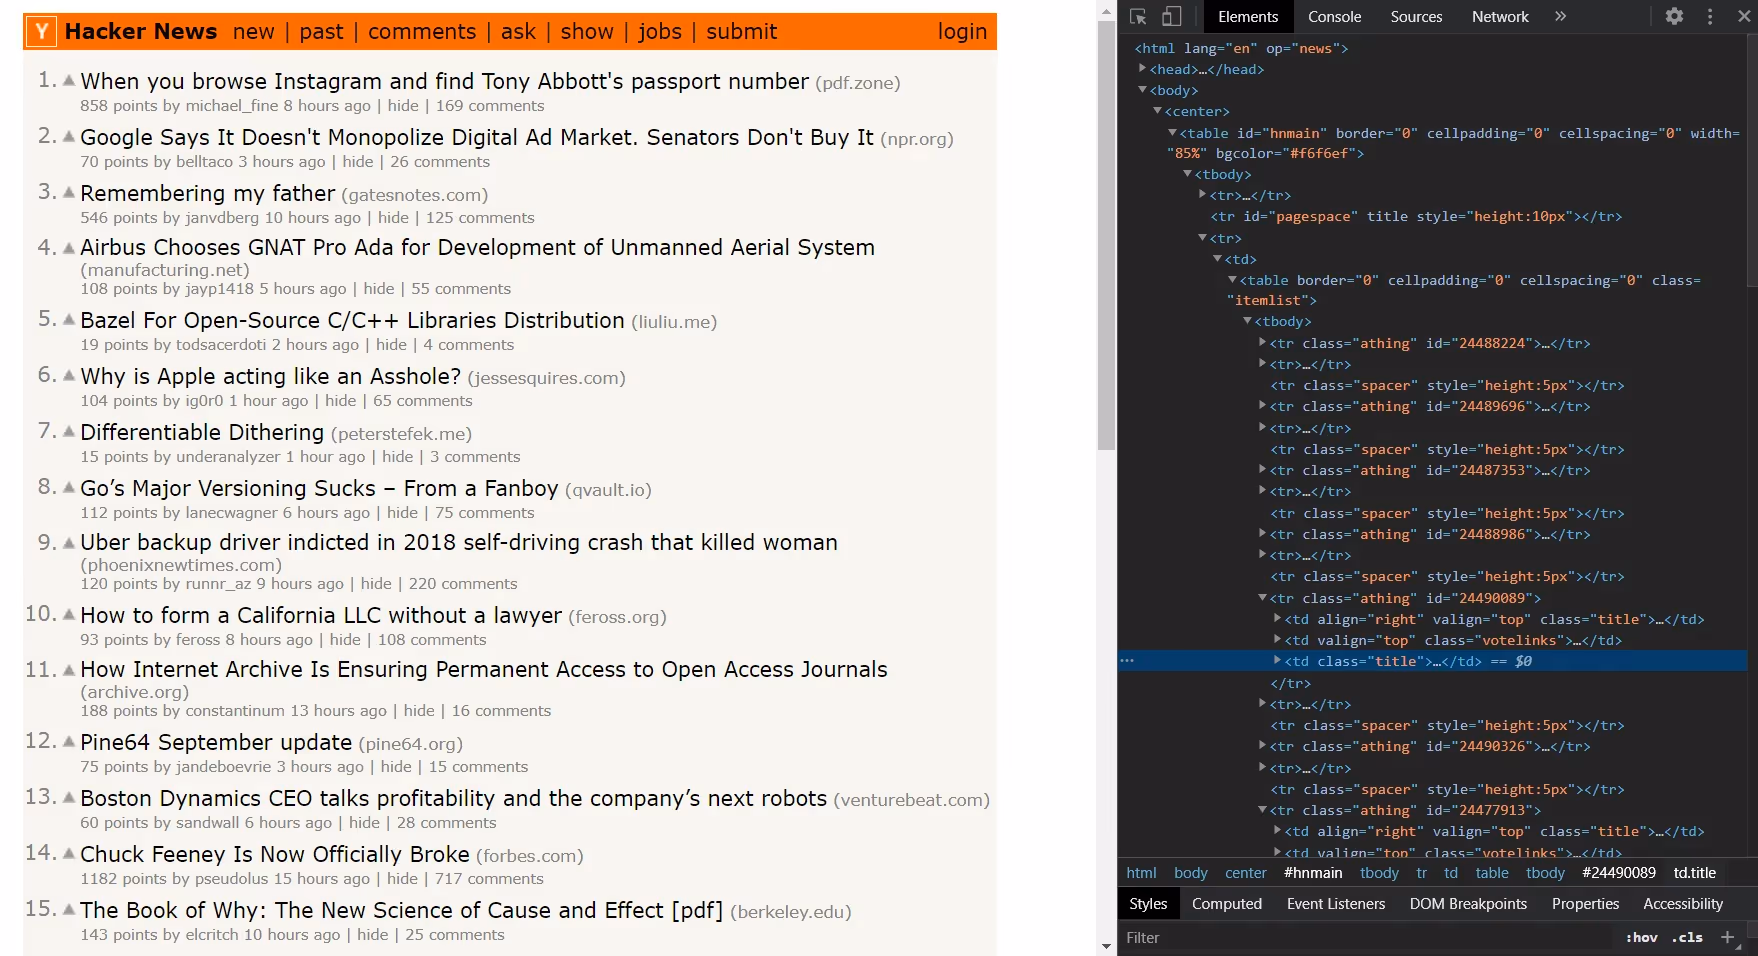
Now that our project is set-up, we can visit HackerNews and inspect the code to see which DOM elements we need to target.
Visit HackerNews and right-click on the page and press “Inspect” to open the developer tools.
That’ll open up the developer tools which looks like:
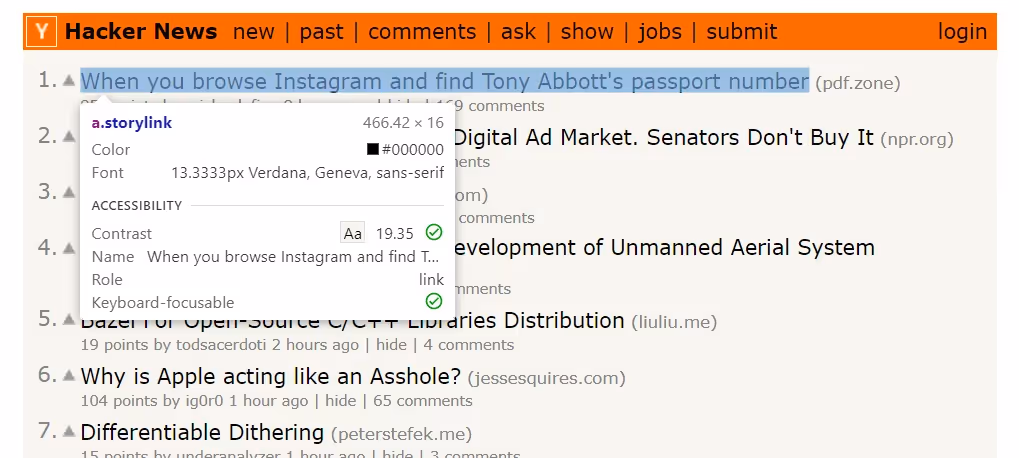
Since we want the title and URL, we can search for their DOM elements by pressing Control + Shift + C to select an element. When you hover over an element on the website after pressing Control + Shift + C then the element will be highlighted and you can see information about it.
If you click the highlighted element then it will open up in the developer tools.
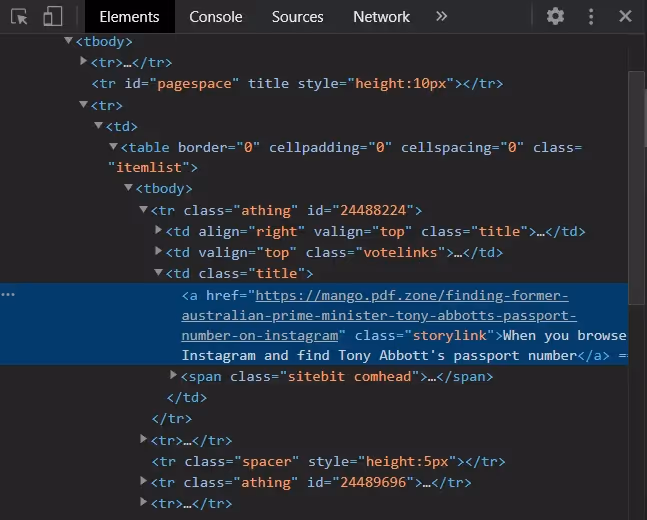
This anchor tag has all the data we need. It contains the title and the href of the link. It also has a class of storylink so what we need to do is select all the elements with a class of storylink in our code and then extract the data we want.
3. Use Cheerio and Axios to get HTML data from HackerNews
Now it’s time to start using Cheerio and Axios to scrape HackerNews.
Delete the hello world console log and add the packages to your script at the top of your file.
-- CODE language-js --const cheerio = require("cheerio");
const axios = require("axios");
Next, we want to call axios using their get method to make a request to the HackerNews website to get the HTML data.
That code looks like this:
-- CODE language-js --axios.get("https://news.ycombinator.com/").then((response) => {
console.log(response.data);
});
If you run your script now, then you should see a large string of HTML code.
Here is where Cheerio comes into play.
We want to load this HTML code into a Cheerio variable and with that variable, we’ll be able to run jQuery like methods on the HTML code.
That code looks like:
-- CODE language-js --axios.get("https://news.ycombinator.com/").then((response) => {
let $ = cheerio.load(response.data);
});
The $ is the variable that contains the parsed HTML code ready for use.
Since we know that the .storylink class is where our data lies, we can find all of the elements that have a .storylink class using the $ variable. That looks like:
-- CODE language-js --axios.get("https://news.ycombinator.com/").then((response) => {
let $ = cheerio.load(response.data);
console.log($(".storylink"));
});
If you run your code now, you’ll see a large object that is a Cheerio object. Next, we will run methods on this Cheerio object to get the data we want.
4. Get the title and link using Cheerio
Since there are many DOM elements containing the class storylink, we want to loop over them and work with each individual one.
Cheerio makes this simple with an each method. This looks like:
-- CODE language-js --axios.get("https://news.ycombinator.com/").then((response) => {
let $ = cheerio.load(response.data);
$(".storylink").each((i, e) => {
console.log(i);
console.log(e);
}
});
i is the index of the array, and e is the element object.
What this does is loop over all the elements containing the storylink class and within the loop, we can work with each individual element.
Since we want the title and URL, we can access them using text and attr methods provided by Cheerio. That looks like:
-- CODE language-js --axios.get("https://news.ycombinator.com/").then((response) => {
let $ = cheerio.load(response.data);
$(".storylink").each((i, e) => {
let title = $(e).text();
let link = $(e).attr("href");
console.log(title);
console.log(link);
}
});
If you run your code now, you should see a large list of post titles and their URLs!
Next, we’ll save this data in a CSV file.
5. Save the title and link into a CSV file.
Creating CSV files in Node.js is easy. We just need to import a module called fs into our code and run some methods. fs is available with Node so we don’t have to install any new packages.
At the top of your code add the fs module and create a write stream.
-- CODE language-js --const fs = require("fs");
const writeStream = fs.createWriteStream("hackernews.csv");
What this does is it creates a file called hackernews.csv and prepares your code to write to it.
Next, we want to create some headers for the CSV file. This looks like:
-- CODE language-js --writeStream.write(`Title,Link \n`);
What we’re doing here, is just writing a single linke with the string Title,Link \n.
This prepares the CSV with headings.
What’s left is to write a line to the CSV file for every title and link. That looks like:
-- CODE language-js --axios.get("https://news.ycombinator.com/").then((response) => {
let $ = cheerio.load(response.data);
$(".storylink").each((i, e) => {
let title = $(e).text();
let link = $(e).attr("href");
writeStream.write(`${title}, ${link} \n`);
});
});
What we’re doing is writing a new line to the file that contains the title and link in its appropriate location and then adding a new line for the next line.
The string in use is called template literals and it’s an easy way to add variables to strings in nicer syntax.
If you run your code now, you should see a CSV file created in your directory with the title and link of all the posts from HackerNews.
Searching DuckDuckGo with Nightmare.js
In this tutorial, we'll be going over how to search DuckDuckGo with Nightmare.js and get the URLs of the first five results.
Nightmare.js is a browser automation library that uses Electron to mimic browser like behavior. Using Nightmare, you're able to automate actions like clicking, entering forms, going to another page, and everything you can do on a browser manually.
To do this, you use methods provided by Nightmare such as `goto`, `type`, `click`, `wait`, and many others that represent actions you would do with a mouse and keyboard.
Let's get started.
Prerequisites
- Node.js installed on your computer.
- Basic understanding of Javascript and Node.js.
- Basic understanding of the DOM.
1. Project setup
If you've initialized a Node project as outlined in the previous tutorial, you can simply create a new file in the same directory called `nightmare.js`.
If you haven't created a new Node project, follow Step 1 in the previous tutorial to see how to create a new Node.js project.
Next, we'll add the nightmare.js package. In your terminal, type:
yarn add nightmare
Next, add a console.log message in `nightmare.js` to get started.
Your `nightmare.js` file should look like:
-- CODE language-js --console.log("Hello from nightmare!");
If you run `node nightmare` in your terminal, you should see:
Hello from nightmare!
2. See what DOM elements we need using the developer tools
Next, let's visit [DuckDuckGo.com](https://duckduckgo.com/) and inspect the website to see which DOM elements we need to target.
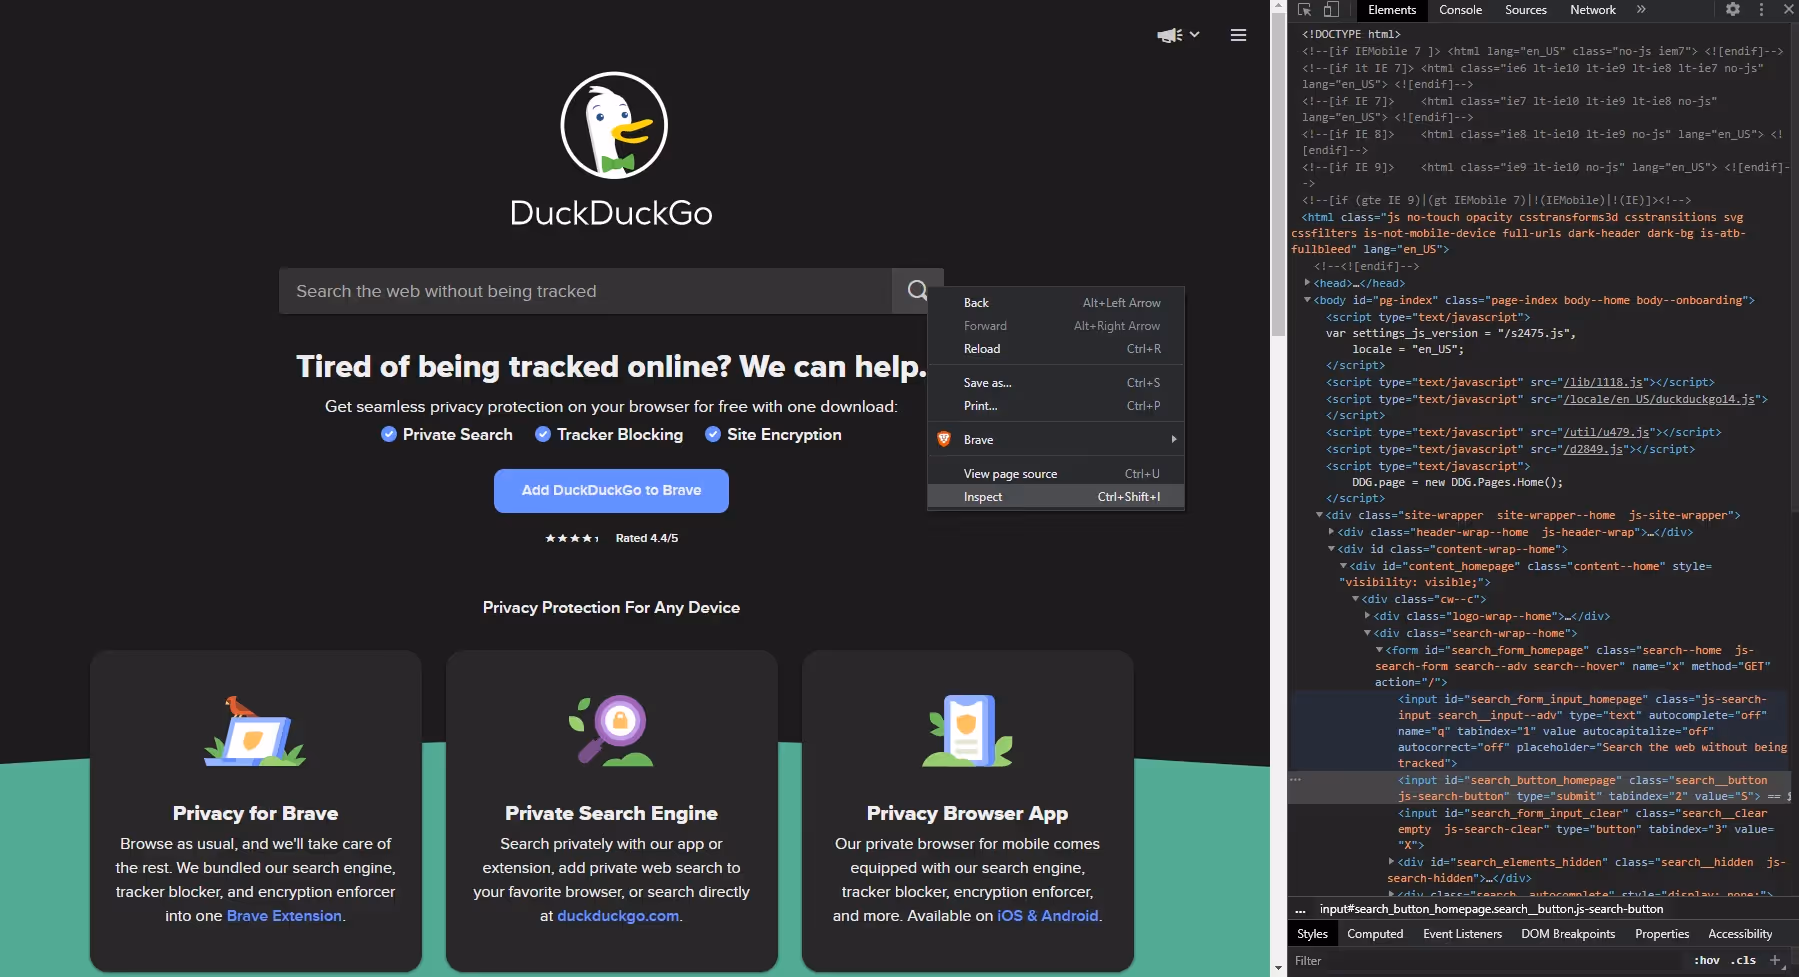
Visit DuckDuckGo and open up the developer tools by right-clicking on the form and selecting `Inspect`.
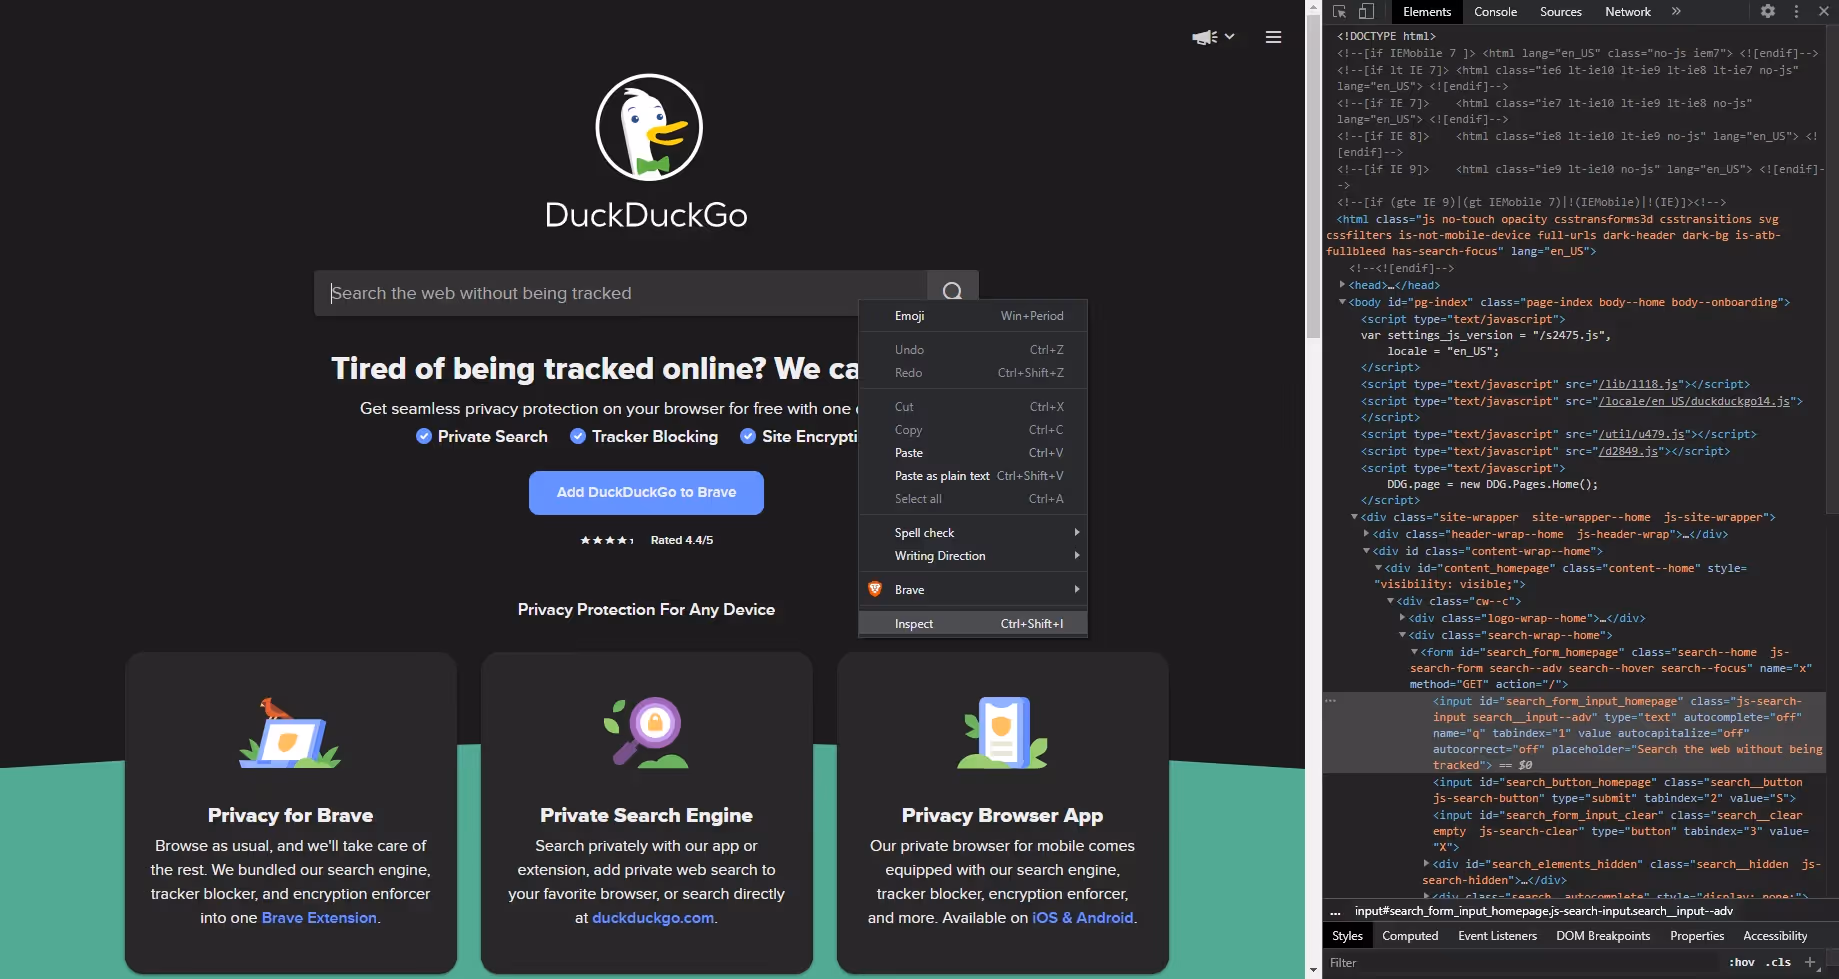
And from the developer tools, we can see that the ID of the input form is `search_form_input_homepage`. Now we know to target this ID in our code.
Next, we need to click the search button to complete the action of entering a search term and then searching for it.
Right-click the search icon on the right side of the search input and click `Inspect`.
From the developer tools, we can see that the ID of the search button is `search_button_homepage`. This is the next element we need to target in our Nightmare script.
3. Search for a term in DuckDuckGo using Nightmare.js
Now we have our elements and we can start our Nightmare script.
In your nightmare.js file, delete the console.log message and add the following code:
-- CODE language-js --const Nightmare = require("nightmare");
const nightmare = Nightmare({ show: true });
nightmare
.goto("https://duckduckgo.com")
.type("#search_form_input_homepage", "web scraping")
.click("#search_button_homepage")
.then();
What we're doing here is first importing the Nightmare module, and then creating the nightmare object to work with.
The nightmare object takes in some options that you can see more of [here](https://github.com/segmentio/nightmare#nightmareoptions). The option we care about is `show: true` because this shows the electron instance and the actions being taken. You can hide this electron instance by setting `show` to `false`.
Next, we're telling the nightmare instance to take some actions. The actions are described using the methods `goto`, `type`, `click`, and `then`. They describe what we want nightmare to do.
First, we want it to go to the duckduckgo URL. Then, we want it to select the search form element and type "web scraping". Then, we want it to click the search button element. Then, we're calling `then` because this is what makes the instance run.
If you run this script, you should see Nightmare create an electron instance, go to duckduckgo.com, and then search for web scraping.
4. Get the URLs of the search results
The next step in this action is to get the URLs of the search results.
As you saw in the last step, Nightmare allows us to go to another page after taking an action like searching in a form, and then we can scrape the next page.
If you go to the browser and right-click a link in the search results page of DuckDuckGo, you'll see the element we need to target.
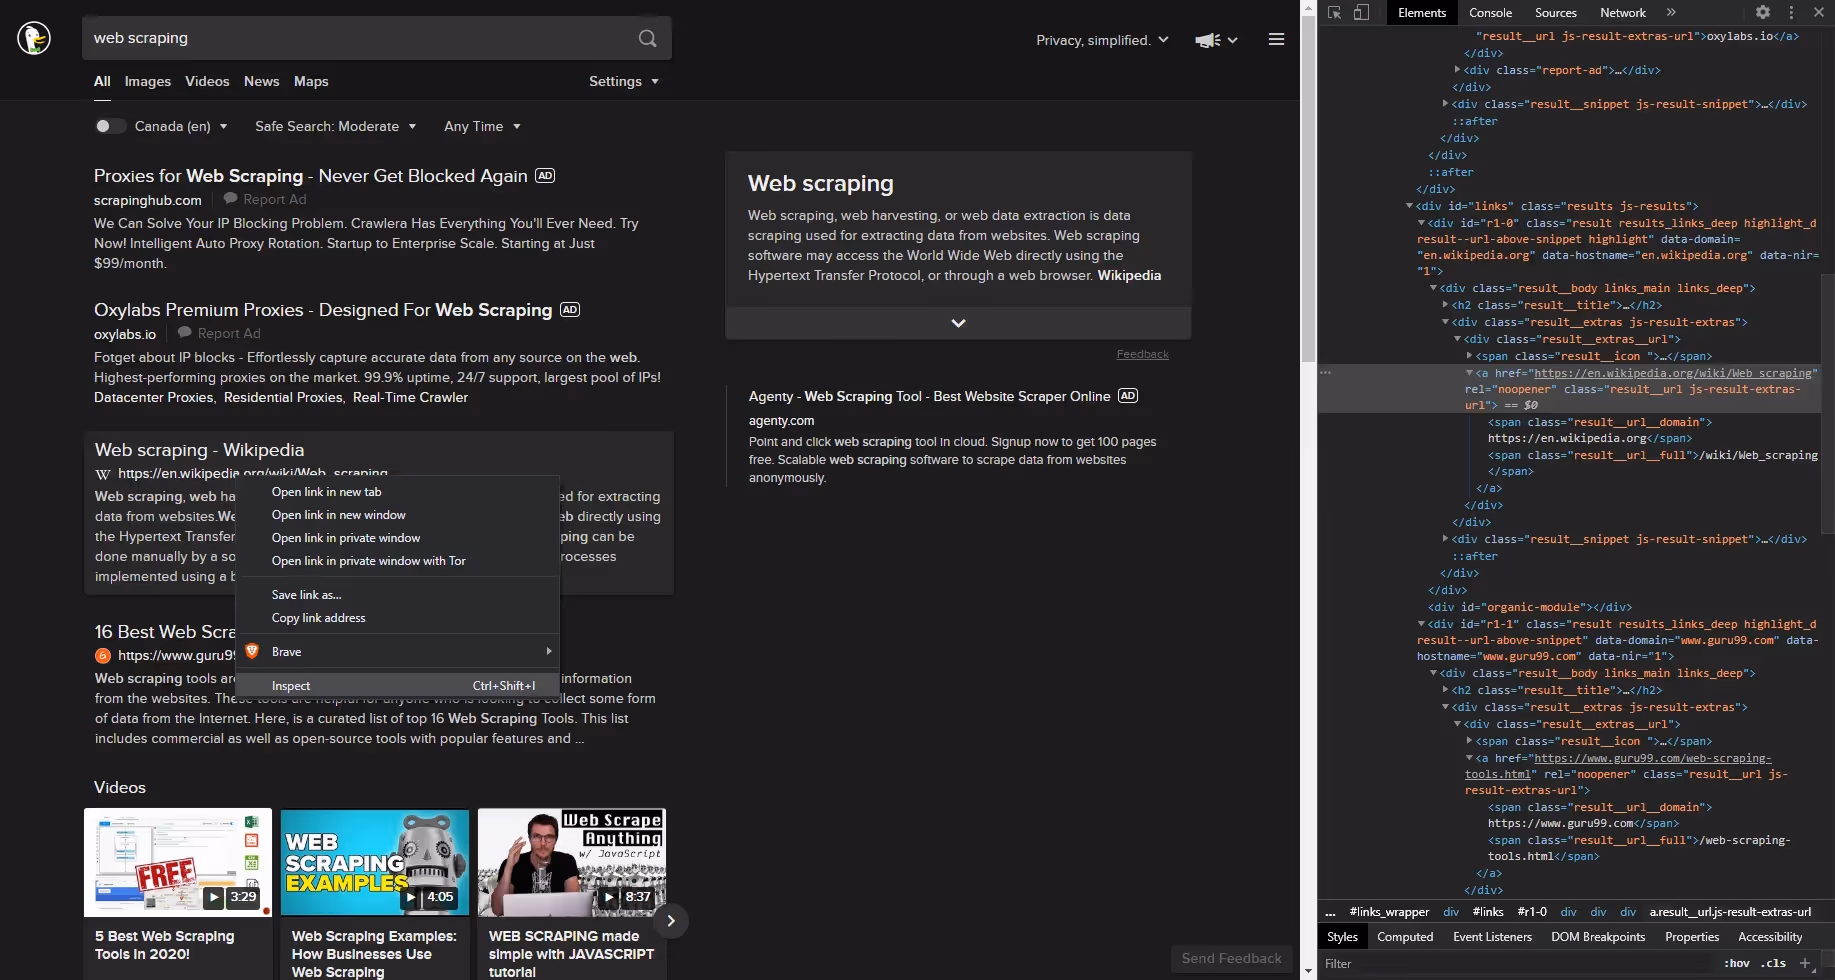
The class of the URL result we want is `result__url js-result-extras-url`.
To get DOM element data in Nightmare, we want to write our code in their `evaluate` method and return the data we want.
Update your script to look like this:
-- CODE language-js --
nightmare
.goto("https://duckduckgo.com")
.type("#search_form_input_homepage", "web scraping")
.click("#search_button_homepage")
.wait(3000)
.evaluate(() => {
const results = document.getElementsByClassName(
"result__url js-result-extras-url"
);
return results;
})
.end()
.then(console.log)
.catch((error) => {
console.error("Search failed:", error);
});
What we added here is a `wait`, `evaluate`, `end`, `catch`, and a console.log to the `then`.
The `wait` is so we wait a few seconds after searching so we don't scrape a page that didn't load.
Then `evaluate` is where we write our scraping code. Here, we're getting all the elements with a class of `result__url js-result-extras-url` and returning the results which will be used in the `then` call.
Then `end` is so the electron instance closes.
Then `then` is where we get the results that were returned from `evaluate` and we can work with it like any other Javascript code.
Then `catch` is where we catch errors and log them.
If you run this code, you should see an object logged.
-- CODE language-js --{
'0': { jQuery1102006895228087119576: 151 },
'1': { jQuery1102006895228087119576: 163 },
'2': { jQuery1102006895228087119576: 202 },
'3': { jQuery1102006895228087119576: 207 },
'4': { jQuery1102006895228087119576: 212 },
'5': { jQuery1102006895228087119576: 217 },
'6': { jQuery1102006895228087119576: 222 },
'7': { jQuery1102006895228087119576: 227 },
'8': { jQuery1102006895228087119576: 232 },
'9': { jQuery1102006895228087119576: 237 },
'10': { jQuery1102006895228087119576: 242 },
'11': { jQuery1102006895228087119576: 247 },
'12': { jQuery1102006895228087119576: 188 }
}
This is the object returned from the evaluate method. These are all the elements selected by `document.getElementsByClassName("result__url js-result-extras-url");`.
We don't want to use this object, we want the URLs of the first 5 results.
To get the URL or href of one of these objects, we simply have to select it using `[]` and calling the `href` attribute on it.
Update your code to look like this:
-- CODE language-js --nightmare
.goto("https://duckduckgo.com")
.type("#search_form_input_homepage", "web scraping")
.click("#search_button_homepage")
.wait(3000)
.evaluate(() => {
const results = document.getElementsByClassName(
"result__url js-result-extras-url"
);
const urls = [];
urls.push(results[2].href);
urls.push(results[3].href);
urls.push(results[4].href);
urls.push(results[5].href);
urls.push(results[6].href);
return urls;
})
.end()
.then(console.log)
.catch((error) => {
console.error("Search failed:", error);
});
Since the first two elements are URLs of ads, we can skip them and go to elements 2-6.
What we're doing here is creating an array called `urls` and pushing 5 hrefs to them. We select an element in the array using `[]` and call the existing href attribute on it. Then we return the URLs to be used in the `then` method.
If you run your code now, you should see this log:
-- CODE language-js --[
"https://en.wikipedia.org/wiki/Web_scraping",
"https://www.guru99.com/web-scraping-tools.html",
"https://www.edureka.co/blog/web-scraping-with-python/",
"https://www.webharvy.com/articles/what-is-web-scraping.html",
"https://realpython.com/tutorials/web-scraping/",
];
And this is how you get the first five URLs of a search in DuckDuckGo using Nightmare.js.
What we covered
- Introduction to web scraping with Node.js
- Important concepts for web scraping.
- Popular web scraping libraries in Node.js
- A tutorial about how to scrape the HackerNews frontpage and save data to a CSV file.
