Oops! Something went wrong while submitting the form.
No credit card required
Get your free
Image Processing API
key now
4.8 from 1,863 votes
See why the best developers build on Abstract
Thank you! Your submission has been received!
Oops! Something went wrong while submitting the form.
No credit card required
Images are an essential part of the web. They have been around since the beginning of Web 1.0 and continue to adorn web pages. The proliferation of images leads to the problem of managing their volume. If you are building any web application that lets users upload images, then it might be a clever idea to set some limits to the image sizes, to avoid wastage of bandwidth and space.
In this blog post, we will show you how to perform PHP image resize operations on a web application. We have a demo app for you, built on the Laravel PHP framework. With Abstract Image Processing and Optimization API, it is super easy to integrate image resize operations on a PHP-based application.
Before proceeding to build the demo web app, it is worthwhile to take a quick tour of the API.
What is the Abstract Image Processing and Optimization API
This API is an offering from AbstractAPI for quick and easy optimization of images. It can resize the images based on various strategies for the aspect ratio. It also can crop and add background fill to images.
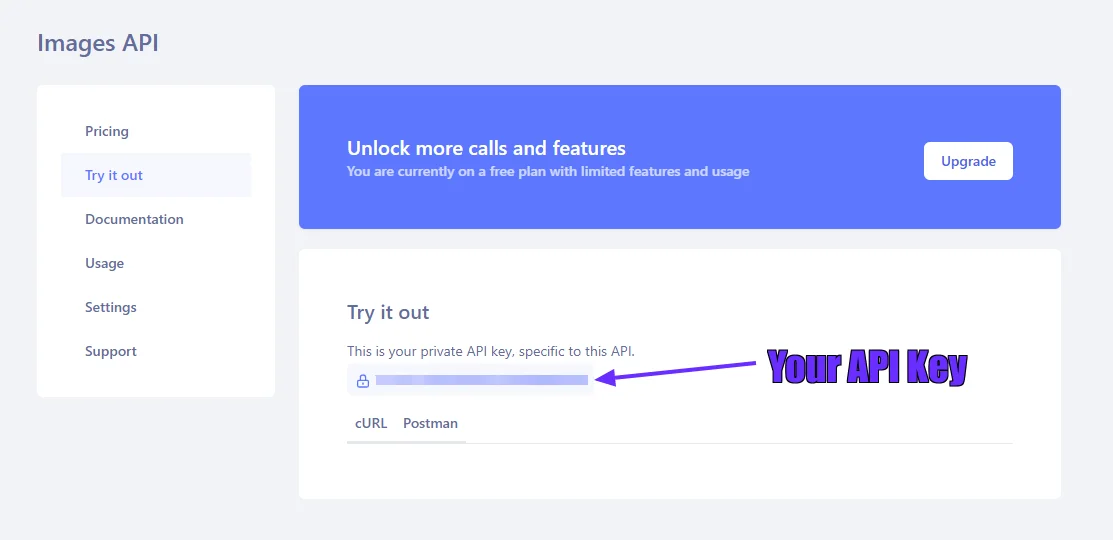
To get started with the Abstract Image Processing and Optimization API, signup for your AbstractAPI account and head over to the API dashboard, where you can see your API key.
This API offers a free quota of 100 MB size of images per month, which should be good enough for you to play around with it. For details on API usage, you can check out the documentation.
This app demonstrates a simple image resizing operation based on the width and height of an image. We have decided to go with the Laravel PHP framework as it is one of the most popular PHP frameworks. It is an open-source MVC framework in PHP for building simple to complex web applications. Laravel strictly follows the MVC (Model-View-Controller) architectural pattern. It is known for its beautiful and elegant syntax as a web framework.
Let’s dive in to build this PHP image resize demo app. This app provides an option to upload an image and then asks the user to enter the desired width and height of the resized image. Upon submitting the resizing request, the app calls the Abstract API to return the resized image. Both the original image and the resized image are displayed on the app UI.
Before proceeding further, here are a few prerequisites for the development environment for building this demo app.
Prerequisites
1. PHP and Laravel: Make sure you have a PHP 8 runtime available with Laravel. You can install Laravel with the composer package manager.
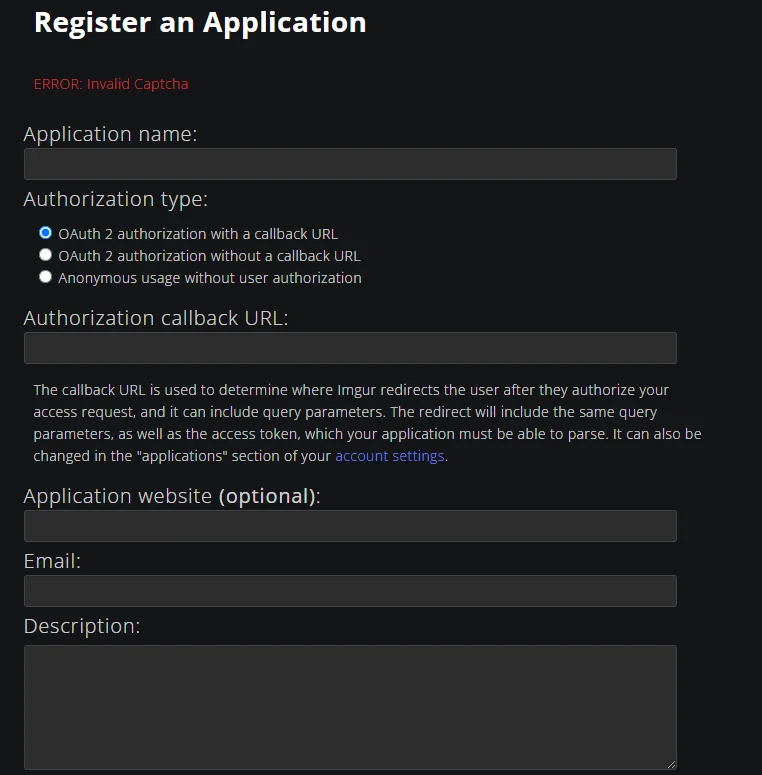
2. Imgur Account: You will need an Imgur account to host the images to be resized Signup for an account on Imgur. You will also need the Imgur API access by registering a client application. To do that, open the Imgur registration page:
And fill in the following details
Application name: image resize
Authorization: OAuth2 Authorization with a callback URL
This will create a directory named image-resize under the present working directory where the command is executed. This is the project directory of this demo app containing all the boilerplate code and dependencies. Make sure to change to this directory for executing all further commands from the terminal.
4. Open your favorite IDE and check out the directory structure of the project directory
Step 1: Test the Default Laravel App
Following the prerequisites, you should be able to test the default Laravel by launching it from the terminal.
php artisan serve
This will launch a development web server that hosts the default Laravel app at https://127.0.0.1:8000
Step 2: Add the API Keys for Demo App
Open the environment file for the project and add two new environment variable entries for the Imgur Client ID and Abstract API key.
These two helper classes handle the API calls for Imgur and AbstractAPI respectively.
The Imgur API is used to upload a source image file from the demo app as an image object and host it as an URL. This URL is an input to AbstractAPI’s Image Processing and Optimization API. This API returns the resized image in the API response as another URL. The resize parameters for the API include the width and height and orientation strategy. The width, height values are passed from the demo app UI.
Step 4: Add a New Controller Named ImageController
From the terminal, add a new controller named ImageController.
php artisan make:controller ImageController
This will create a new PHP file app/Http/Controllers/ImageController
Replace the default content of the file with the following code:
<?php
namespace App\Http\Controllers;

use App\Http\Helpers\AbstractAPI;
use App\Http\Helpers\Imgur;
use Illuminate\Http\Request;

class ImageController extends Controller
{
    public function index()
    {
        return view('welcome');
    }

    public function upload(Request $request)
    {
        $valid = $request->validate([
            'image' => 'required|image|mimes:jpeg,png,jpg,gif,svg|max:2048',
           'width' => 'required|numeric',
            'height' => 'required|numeric',
        ]);

        try {
            // upload to imgur and get the link
            $imgur = (new Imgur())->upload($request->file('image'));

            // get the image link
            if ($imgur['success'] === true || $imgur['status'] === 200) {
                $valid['url'] = $imgur['data']['link'];
                // send image link to abstract api
                $abstract = (new AbstractAPI())->formatImage($valid);

                return response()->json($abstract);


            }

            return response()->json([
                'success' => false,
                'message' => 'Something went wrong',
            ]);
        } catch (\Exception $e) {
            return response()->json([
                'success' => false,
                'message' => $e->getMessage(),
            ]);
        }

    }
}
This controller defines a custom API endpoint called upload. This API accepts the image from the UI and calls Imgur and AbstractAPI sequentially to return the resized image.
This controller also defines the home page view for the UI.
Step 5: Update the App Routes
You must register the routes for the demo app in Laravel. There are only two routes, ‘/’ and ‘/upload’ for displaying the UI page and uploading the images, respectively.
Replace the content of the routes definition under routes/web.php.
<?php

use Illuminate\Support\Facades\Route;

/*
|--------------------------------------------------------------------------
| Web Routes
|--------------------------------------------------------------------------
|
| Here is where you can register web routes for your application. These
| routes are loaded by the RouteServiceProvider within a group which
| contains the "web" middleware group. Now create something great!
|
*/

Route::get('/', [App\Http\Controllers\ImageController::class, 'index'])->name('home');
Route::post('/upload', [App\Http\Controllers\ImageController::class, 'upload'])->name('upload');
Step 6: Create the HTML and JavaScript for the Demo App UI
At this point, all the backend PHP logic is built for the demo app. Now the last thing is the HTML page. You can use the default HTML view of the Laravel app under resources/view/welcome.blade.php and replace its content with:
This is a simple Bootstrap based web form that lets the user upload an image for resizing by specifying the target width and height.
With this, all the code changes for the demo app are done. Make sure to save all the files.
Step 7: Relaunch the Laravel Server
Relaunch the Laravel development server and now you should see the demo app UI.
Step 8: Test the Image Resize Demo App
Now you are ready to test the app. Upload a source image from your computer's file system and submit the form by specifying the desired width and height.
Once the Abstract API processes the image, the newly resized file will be displayed along with the target image size.
That's it!
We set out to build this demo app to enable any PHP Laravel-based web application to perform image resizing on its own. And we have achieved it now.
The AbstractAPI Image Processing and Optimization API does the job of managing the nuances of image resizing, while we only focused on building the app logic and frontend UI.
FAQ
How to resize an image?
Resizing an image file involves digital image processing techniques to rearrange the image pixels as per the desired resize dimension. The resize operation also depends on certain factors such as whether the image must be scaled up or down, and whether to retain the aspect ratio or not. However, using an API it is possible to resize images without dealing with the complexities of image processing. AbstractAPI’s Image Processing and Optimization API offers a simple API for performing image resize operations, with options to scale up or down, orientation settings, and crop options.
How do I make an image smaller in PHP?
A PHP-based web application can use the GD library for performing image resize operations. GD has an extensive set of functions for image manipulation, as well as rendering, and supports a variety of image file formats. Alternatively, if you want to avoid the overheads of image processing in the PHP’s business logic, you can go the API route. AbstractAPI Image Processing and Optimization API offers a simple API for performing basic image-related operations for making the image size smaller, larger, or cropping the image. Using the built-in curl library, it is easy to call this API from within the PHP code.
How do I scale an image in Laravel?
In Laravel, you can define separate controllers for handling image-related operations. Since Laravel is based on PHP, you can use one of the popular PHP image-processing libraries such as ImageMagick or GD. Alternatively, you can also define an HTTP helper class for calling an Image manipulation API and invoke it from the controller. AbstractAPI Image Processing and Optimization API can be used for scaling any image within a Laravel app. It supports image scaling, resizing and cropping with several options for setting the image orientation.
Shyam Purkayastha is a proficient web developer and PHP maestro, renowned for his expertise in API creation and integration. His deep knowledge of PHP scripting and backend development enables him to build scalable server-side applications. Shyam is particularly passionate about RESTful API design, significantly enhancing web service functionality and data interoperability.
.png)